Flutter + Cincopa WebView Integration Guide (Using Local HTML)
You can add a Cincopa gallery to your Flutter app to show videos, pictures, or slideshows. By using a WebView and a local HTML file, the gallery will work smoothly inside the app and users can interact with it easily.
In this guide, we’ll walk you through the steps to integrate Cincopa galleries and players—Cincopa’s media players that can include videos, images, or both—into a Flutter app using the WebView widget.
For additional reference, you can also visit the Flutter Welcome Page.
Let’s get started 🚀
Prerequisites:
1. Flutter SDK Installed: You need to have Flutter installed on your system. If you don’t have it, you can download it from the official Flutter website: Flutter Install Guide.
2. Cincopa Embed Gallery Code: You must have the embed code for your Cincopa gallery. This can be obtained from your Cincopa account.
3. WebView Package: We’ll be using the webview_flutter package to display the Cincopa gallery inside the WebView widget.
Steps for Integration:
Step 1. Add Required Dependencies
To begin, you'll need to use the webview_flutter plugin to display HTML content inside your Flutter app.
Open your pubspec.yaml file and add the following dependency under dependencies:
dependencies:
  flutter:
    sdk: flutter
  webview_flutter: ^4.9.0  # or the latest version
After adding the dependencies, run the following command in the terminal to install the required packages:
flutter pub get Step 2. Prepare the Local HTML File
Now, You now need to create a local HTML file that contains your Cincopa gallery embed code.
1. Create a folder named assets in the root of your Flutter project (if not already created).
2. Inside assets, create a file named player.html.
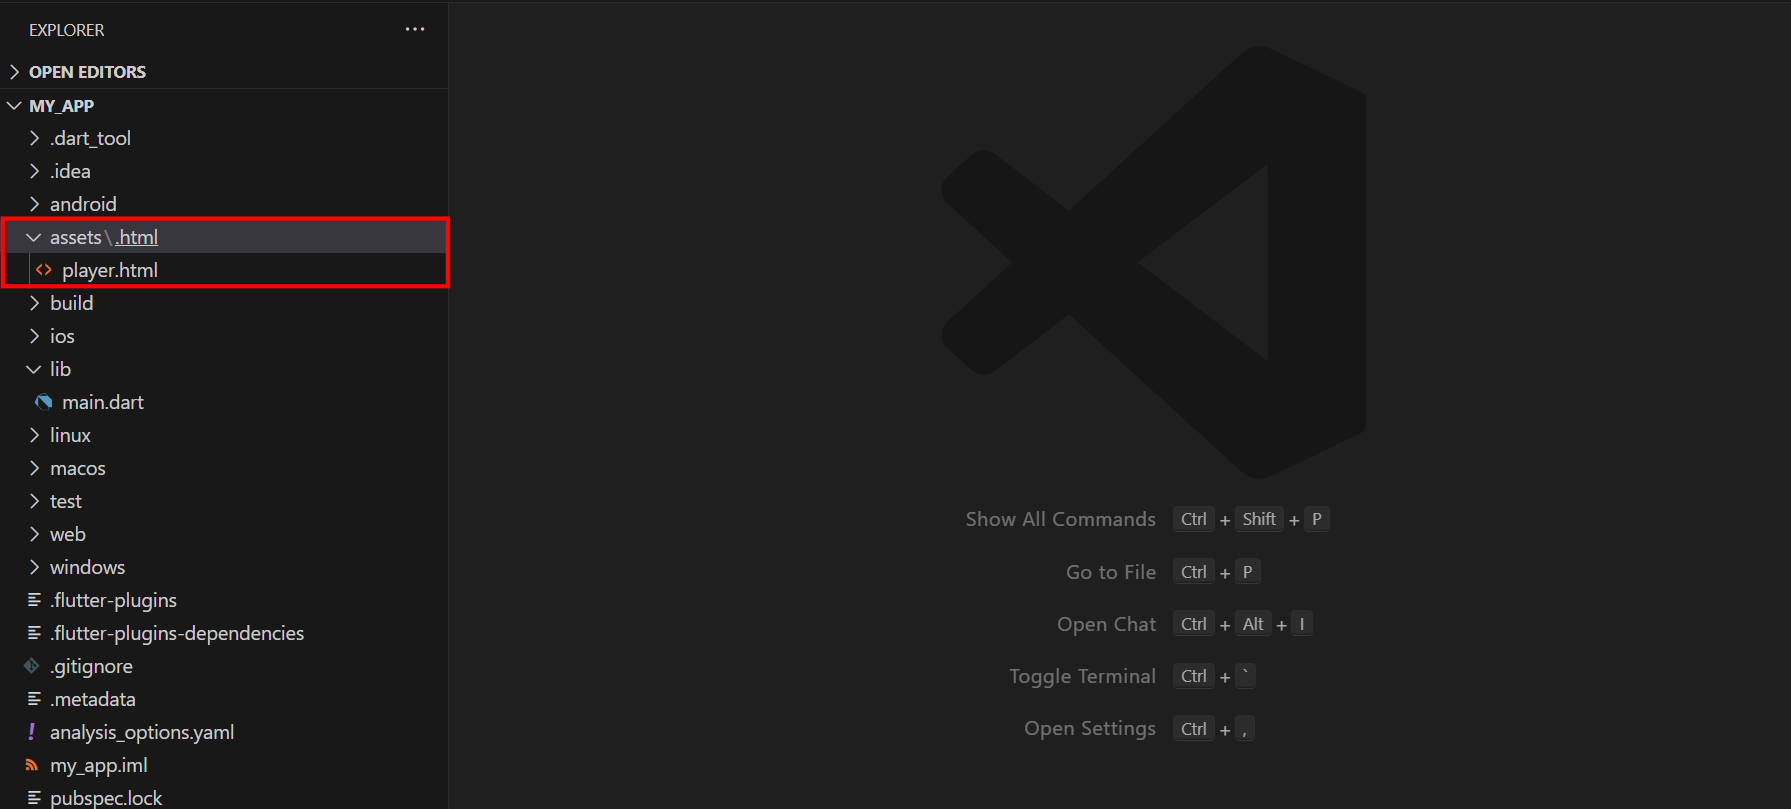
3. Add a new HTML file: Inside the player.html file add the following content:
<!DOCTYPE html>
<html>
  <head>
    <meta name="viewport" content="width=device-width, initial-scale=1.0">
  </head>
  <body>
    <div id='cincopa_asset_ID' class='gallerydemo cincopa-fadein'>
      <div style='width: 100%; height: auto; max-width: 100%;'>
        <img src='https://rtcdn.cincopa.com/thumb.aspx?rid=asset_ID&size=medium' style='filter:blur(5px);object-fit:contain;width:100%;' onload='this.parentNode?this.parentNode.style.opacity=1:"";' />
      </div>
    </div>
    <script src='https://rtcdn.cincopa.com/meta_json.aspx?fid=template_ID!asset_ID&ver=v2&id=cincopa_template_ID!asset_ID' type='text/javascript'></script>
    <script src='https://rtcdn.cincopa.com/libasync.js' type='text/javascript'></script>
  </body>
</html>
Paste the embed code you get from your Cincopa gallery into the <body> of the HTML file. This is what displays the media content inside the Flutter WebView.
Step 3. Register the HTML File as an Asset
To load the HTML file into your WebView, you need to register it as an asset in your Flutter project. Open the pubspec.yaml file again and add the following under the flutter section:
flutter:
  assets:
    - assets/player.html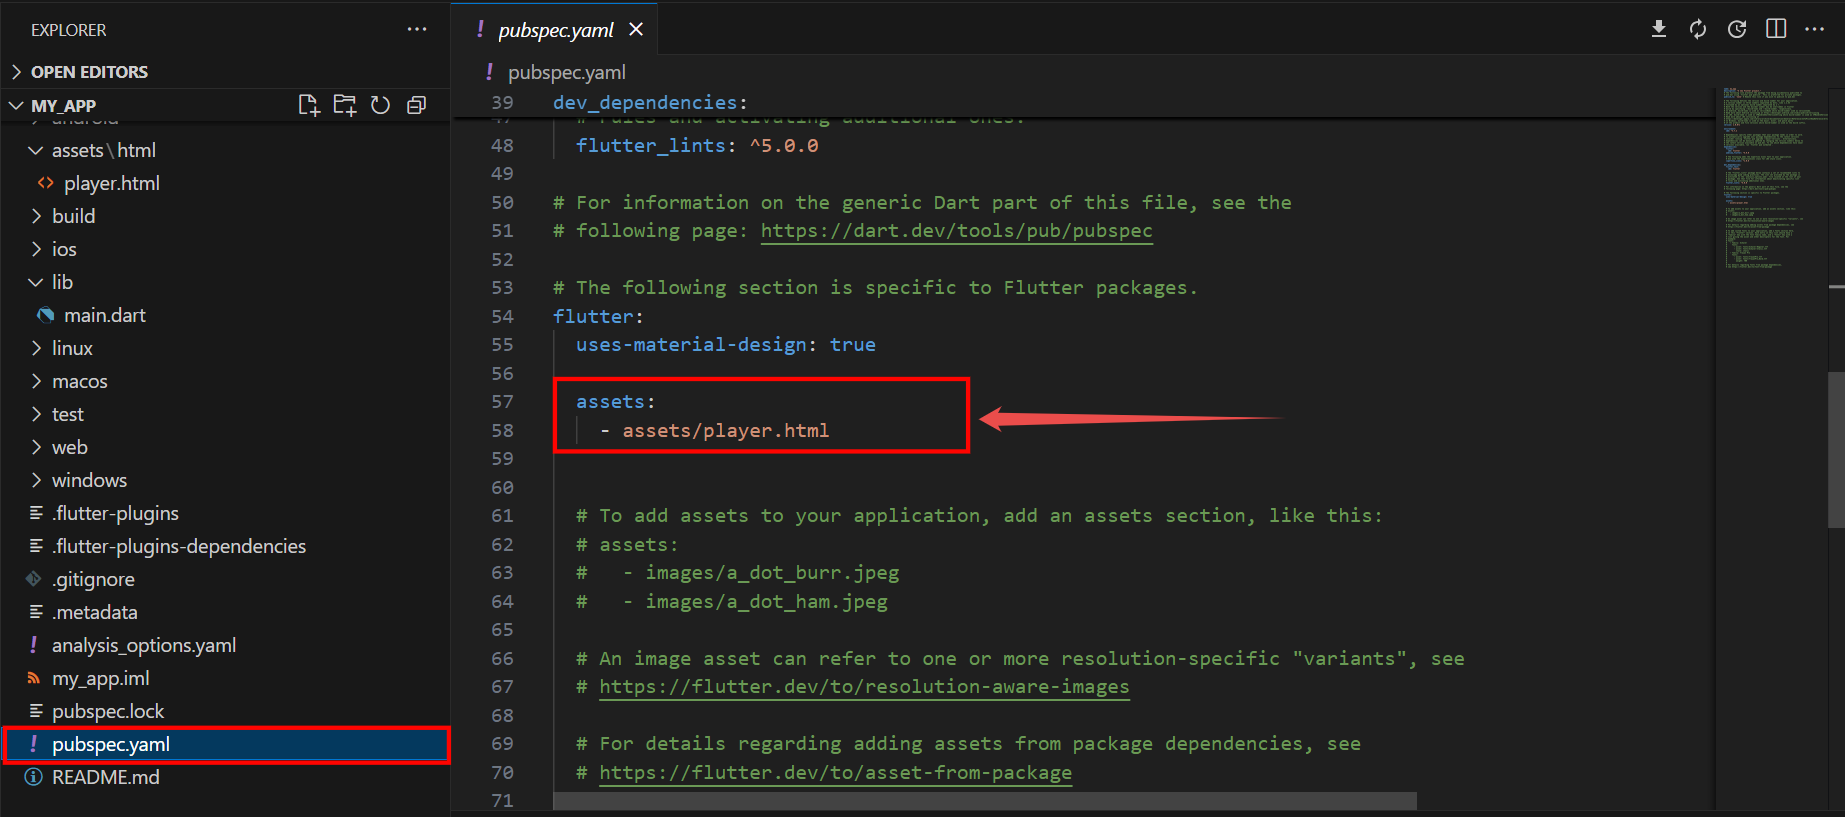
Then, run the following command to make sure your assets are linked:
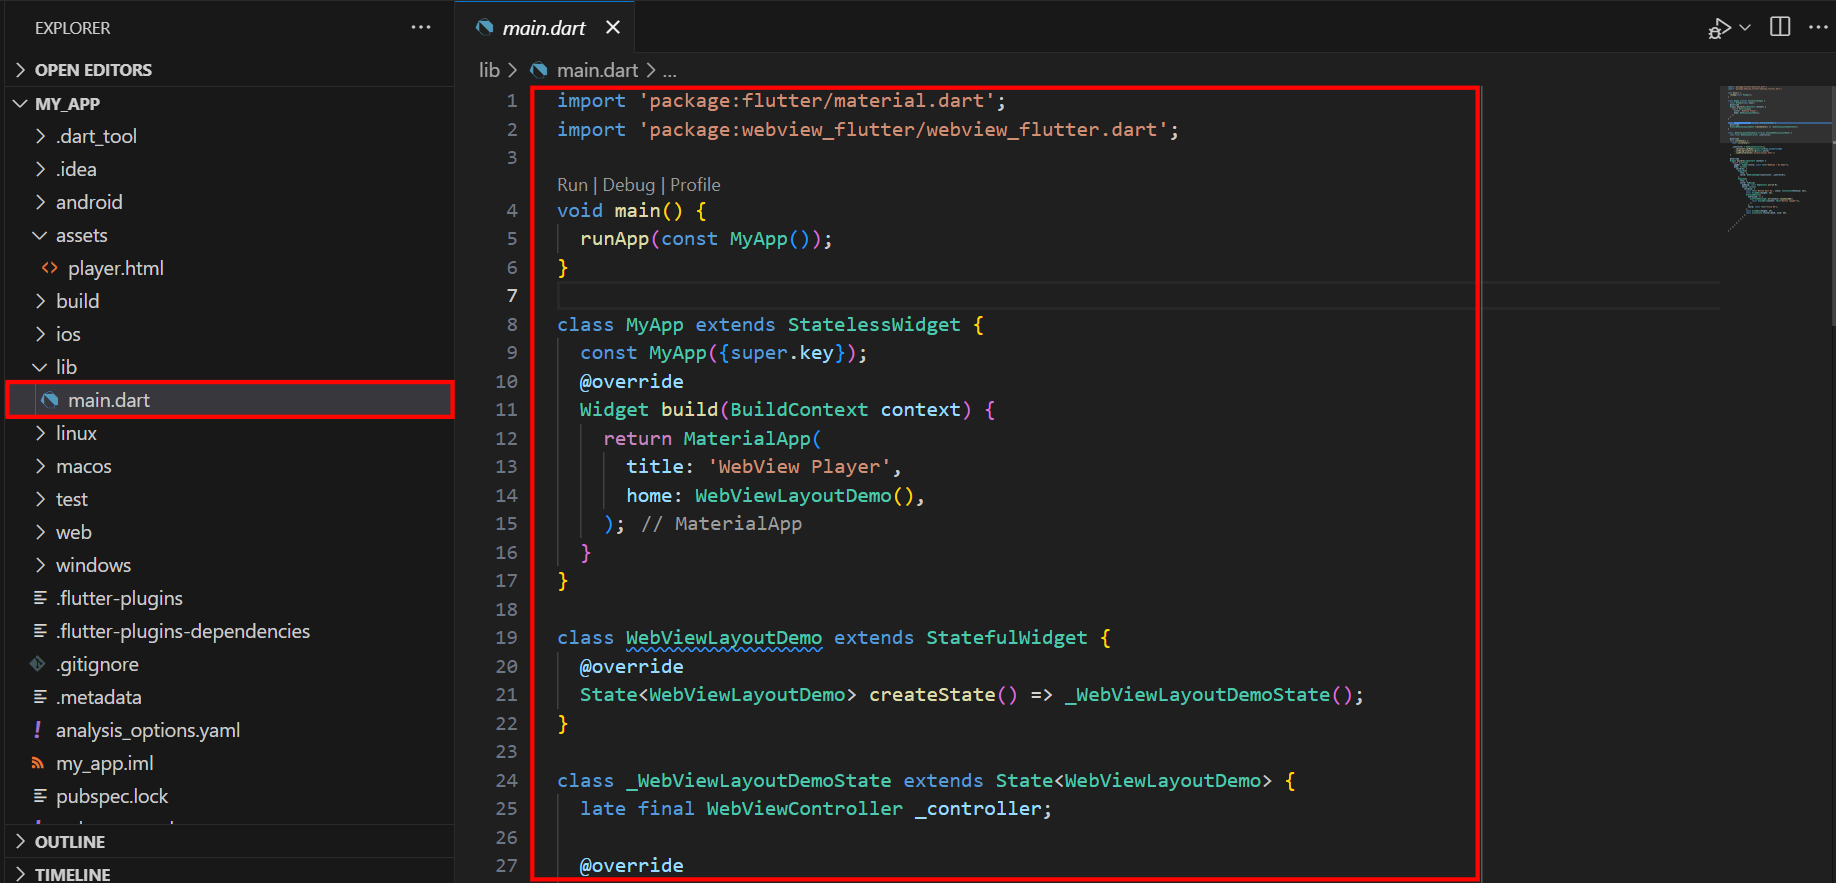
flutter pub get Step 4: Render the Gallery in Flutter (main.dart)
Use the following Dart code in your lib/main.dart file to integrate the Cincopa video player.
import 'package:flutter/material.dart';
import 'package:webview_flutter/webview_flutter.dart';

void main() {
  runApp(const MyApp());
}

class MyApp extends StatelessWidget {
  const MyApp({super.key});
  @override
  Widget build(BuildContext context) {
    return MaterialApp(
      title: 'WebView Player',
      home: WebViewLayoutDemo(),
    );
  }
}

class WebViewLayoutDemo extends StatefulWidget {
  @override
  State<WebViewLayoutDemo> createState() => _WebViewLayoutDemoState();
}

class _WebViewLayoutDemoState extends State<WebViewLayoutDemo> {
  late final WebViewController _controller;

  @override
  void initState() {
    super.initState();

    _controller = WebViewController()
      ..setJavaScriptMode(JavaScriptMode.unrestricted)
      ..setBackgroundColor(Colors.white)
      ..loadFlutterAsset('assets/player.html');
  }

  @override
  Widget build(BuildContext context) {
    return Scaffold(
      appBar: AppBar(title: const Text("WebView + UI Demo")),
      body: Column(
        children: [
          Expanded(
            flex: 1,
            child: WebViewWidget(controller: _controller),
          ),
          Expanded(
            flex: 1,
            child: Padding(
              padding: const EdgeInsets.all(16.0),
              child: Column(
                children: [
                  const Text('Bottom Half UI', style: TextStyle(fontSize: 18)),
                  const SizedBox(height: 16),
                  ElevatedButton(
                    onPressed: () {
                      ScaffoldMessenger.of(context).showSnackBar(
                        const SnackBar(content: Text("Button tapped!")),
                      );
                    },
                    child: const Text("Click Me"),
                  ),
                  const SizedBox(height: 16),
                  const Icon(Icons.flutter_dash, size: 48),
                ],
              ),
            ),
          ),
        ],
      ),
    );
  }
}
Step 5. Android Setup
To allow your app to access internet content and render the WebView properly, update your Android manifest:
1. Open android/app/src/main/AndroidManifest.xml.
2. Add the following inside the <manifest> tag to allow internet access:
<uses-permission android:name="android.permission.INTERNET" />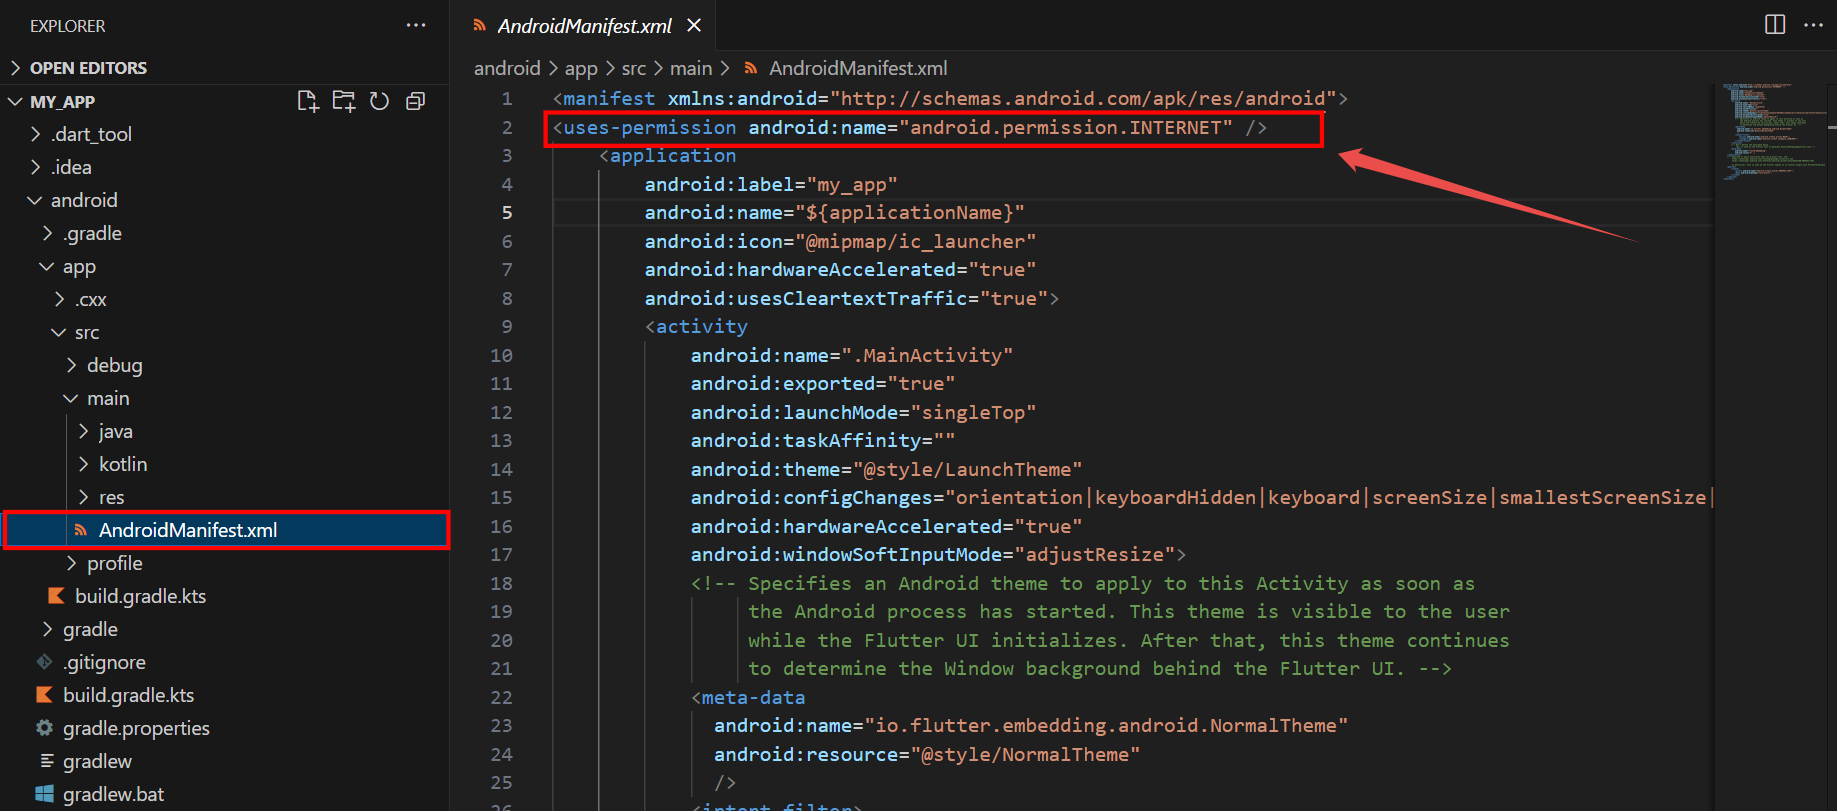
3. Inside the <application> tag, add:
android:hardwareAccelerated="true"
android:usesCleartextTraffic="true"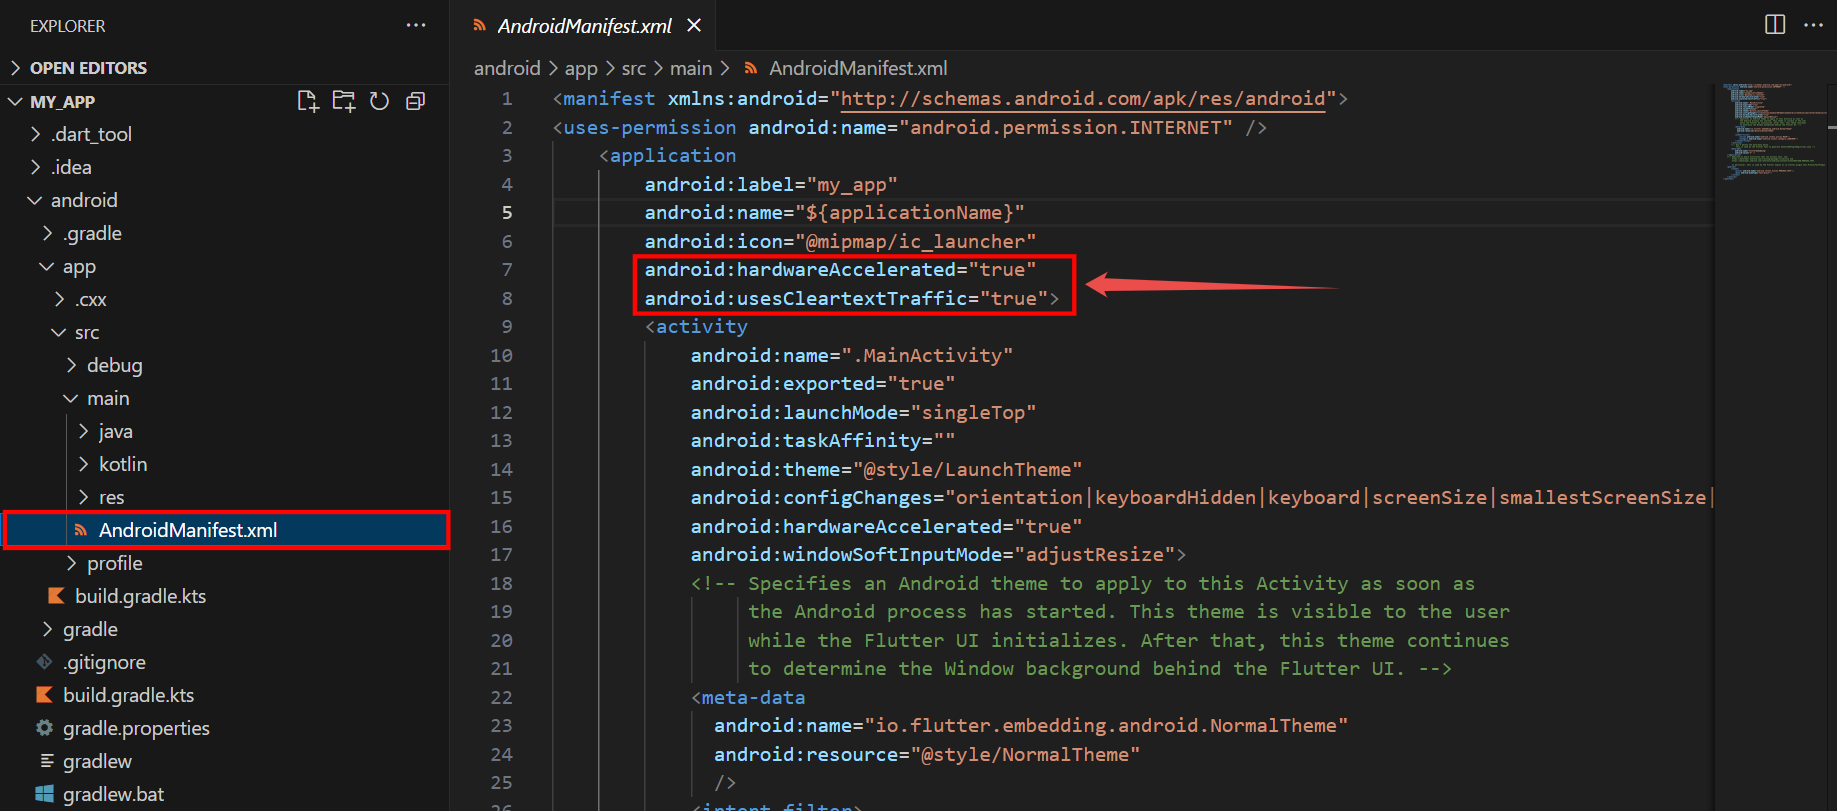
These settings ensure that your app can load external content like the Cincopa gallery and render it smoothly.
Step 6. iOS Setup
For iOS, you need to allow internet access in your app. Open the ios/Runner/Info.plist file and add the following lines to enable internet access:
<key>NSAppTransportSecurity</key>
<dict>
  <key>NSAllowsArbitraryLoads</key>
  <true/>
</dict>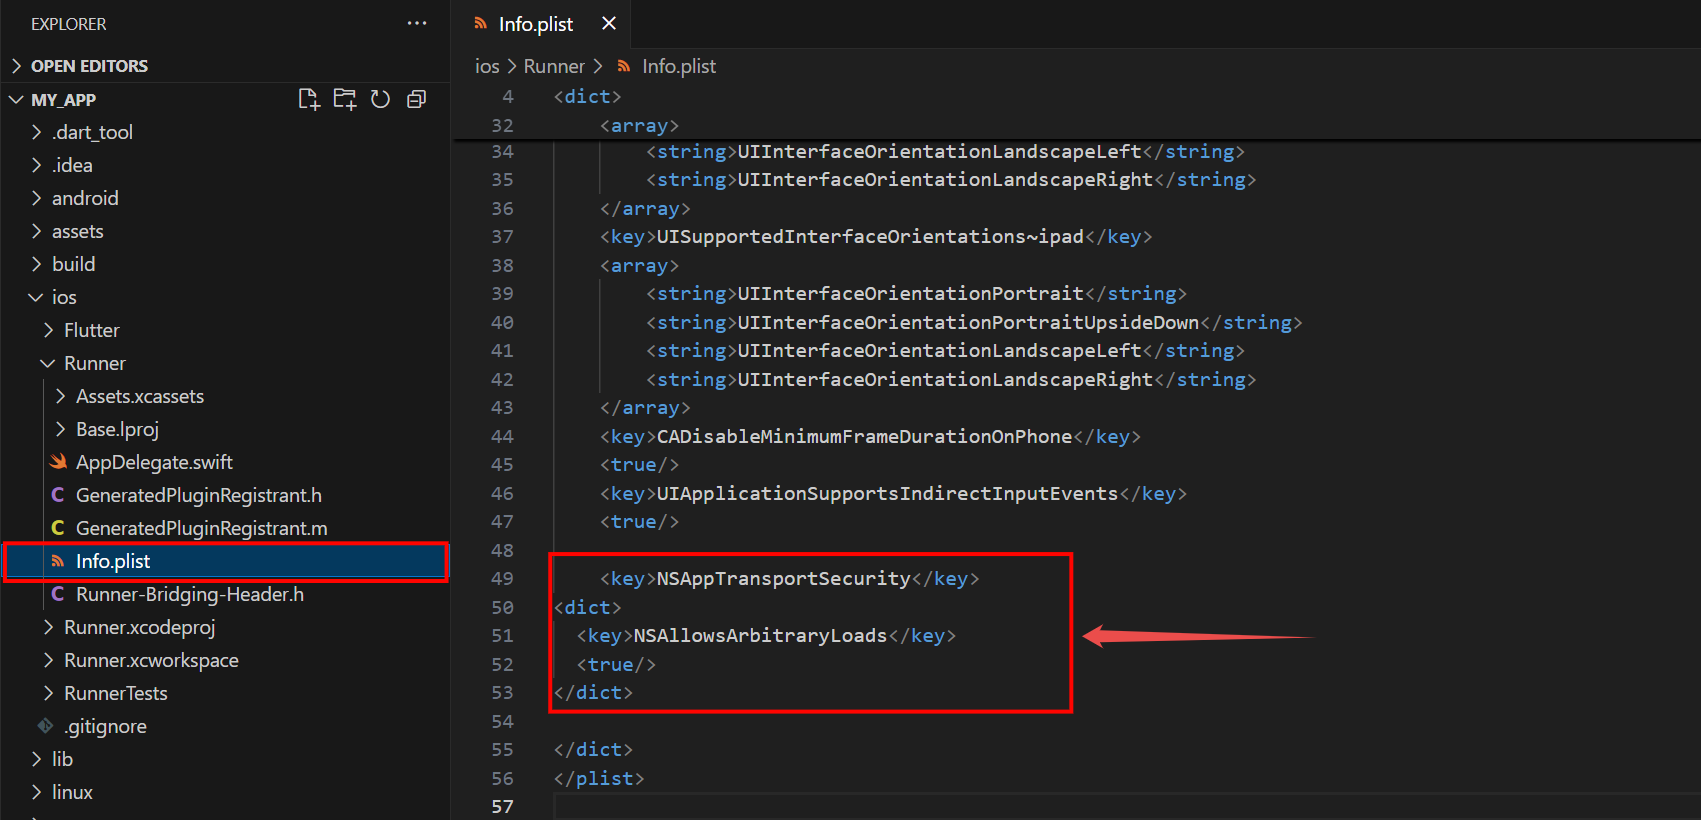
Step 7. Run the Application
After completing all the setup steps—adding dependencies, configuring platform settings, creating the HTML file with your Cincopa embed code, and writing the Dart code—you’re ready to launch the app.
Use the following command to run the app. Make sure your Android emulator or physical device is connected and has internet access.
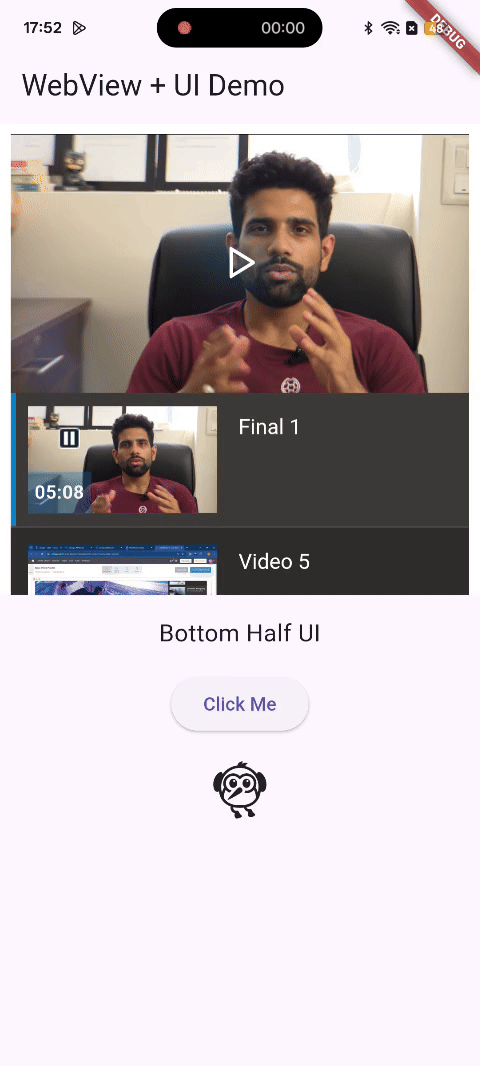
flutter run ✅ Final Result
When the app launches, the screen is divided into two vertical sections:
Top Half displays the Cincopa gallery inside a WebView. This gallery is loaded from the local HTML file (assets/player.html) and includes all interactive features like thumbnails, navigation, and video playback—provided your embed code is correctly configured.
Bottom Half shows a simple Flutter UI with a title, a clickable button that displays a "Button tapped!" message, and a Flutter icon for visual enhancement.
You can download and install the sample Flutter APK to see the integration in action: