Self-Generated Temporary Token(v3)
For businesses like an e-learning platform that provides videos, lessons, or training materials to its users, managing media securely is important. These businesses often need a way to upload new videos, organise their media library, and update details such as titles, descriptions, and metadata directly within their own system, but exposing the main API token in the frontend would put their entire account at risk.
To counter this, a Self-Generated Temporary Token can be used that enables the user to safely perform these actions by generating short-lived, limited-scope tokens that come from an existing parent token. This way, the system can upload or manage media without ever revealing the main API key, while still keeping access tightly controlled and time-bound.
Temporary tokens are required in several Cincopa features that operate directly on the frontend, such as:
Cincopa Library Manager
For example, a platform like ExpertBoxing publishes training videos for its audience and uses YouTube embed codes to display them. This is not a suitable approach, especially when the videos are being sold as a product, because YouTube-embedded videos can be easily copied or downloaded, and the platform has very limited control over how the content is accessed. By using Cincopa, they can safely deliver their videos directly on their website, manage playback settings, access analytics, and use additional tools like the video editor. To keep this workflow secure, they can generate temporary tokens whenever they need to upload or update a video, ensuring that the main API token is never exposed while still allowing their site to perform all required media actions safely.
How It Works
A self-generated temporary token is derived directly from an existing parent token. The process involves four main steps that define how the token is built, encrypted, and validated.
Start with a Parent Token: The parent token is the main token that holds your account’s permissions and access scopes. A temporary token is always derived from this parent token and automatically inherits its permission level. You should apply permissions when generating the temporary token. For example, limiting it to a specific asset (RID), gallery (FID), IP address, or host. Since a temporary token is fully bound to the parent token, it cannot exceed or expand the permissions defined in the parent token.
Build the Payload: A payload is then created to describe the specific parameters of the temporary token. This payload includes the expiry date and time and can also define optional restrictions, such as permissions, the unique identifier of an asset (RID), the unique identifier of a gallery (FID), allowed IP addresses, or hostnames.
Encrypt the Payload: The payload is encrypted using the parent token as the encryption key. This ensures that only the Cincopa server can decrypt or validate the temporary token. The encryption process prevents tampering and conceals the payload content from unauthorized parties. When using one of our frontend libraries, then this encryption process should be done on your server using your code/Cincopa library, and then you can deliver this token to your frontend.
Assemble the Final Token: Once the payload is encrypted, it is combined with the account ID and the last four characters of the parent token to form the final token string. The resulting structure includes all required information in a secure, encoded format.
After creation, this temporary token can be used wherever short-term authentication is required. It remains valid only until the defined expiration time, after which it is automatically rejected by the system.
Token Structure
A v3 temporary token follows this structure:
{accid}i3{last4_parent_token}{encrypted_payload}
Where:
| Part | Description |
|---|---|
| accid | Account ID derived from the parent token prefix. For example, if this is the parent token “1436893io31peuggncdznvzb1f4nhn4tfve” then this is the account ID: “1436893” |
| i3 | Indicates version 3 of the temporary token format. |
| last4_parent_token | Last four characters of the parent token for reference. |
| encrypted_payload | Encrypted content containing expiry and optional parameters. |
Payload Components
The payload contains the following fields:
| Field | Type | Description |
|---|---|---|
| expire | DataTime | Expiry timestamp in UTC (ISO 8601 format). |
| permissions | string | permission scope (e.g., read, write, etc.). |
| rid | string | Limit this token to be able to update only a specific asset (rid). An empty value means that the token can update any asset |
| fid | string | Limit this token to be able to update only a specific gallery (fid). An empty value means that the token can update any gallery. |
| sourceipv4 | string | Limit this token to a specific client IP address. Any attempt to use this token from a different IP address will reject the call. Leave empty to not limit the token to a specific IP address. |
| host | string | Limits the token to requests originating from a specific domain or host. Leave empty if the token should be valid across all domains. |
Create a Self-Generated Temporary Token
This section explains how to generate a self-generated temporary token locally using Node.js and the provided Encrypter implementation. The example below uses Node.js for demonstration purposes, but the same logic can be implemented in any programming language, such as Java, Python, as long as the encryption steps and token format remain consistent.
Prerequisites
Before you start, make sure you have:
- A valid parent token (Cincopa API token) that will be used to derive the temporary token.
Create a New File
Step 1: Open any text editor (VS Code, Notepad, etc.) and create a new file (e.g.,cincopav3_token_generator.js). Paste the following code into the file.
const crypto = require('crypto');
/**
 * Provides AES-256-CBC encryption and decryption compatible with the C# implementation.
 * It uses HKDF-SHA256 for key derivation and a [salt][iv][ciphertext] structure.
 */
class Encrypter {
    static SALT_SIZE = 16;  // 128-bit
    static IV_SIZE = 16;  // 128-bit
    static KEY_SIZE = 32; // 256-bit key
    static ITER = 100000; // For PBKDF2 (DeriveKey_slow)

    /**
     * Encrypts plaintext using a password.
     * @param {string} password - The password to derive the encryption key.
     * @param {string} plaintext - The text to encrypt.
     * @returns {string} A Base64-URL-encoded encrypted string.
     */
    static encrypt(password, plaintext) {
        const salt = Encrypter.randomBytes(Encrypter.SALT_SIZE);
        const key = Encrypter.deriveKey(password, salt);
        const iv = Encrypter.randomBytes(Encrypter.IV_SIZE);

        const cipher = crypto.createCipheriv('aes-256-cbc', key, iv);

        const plainBytes = Buffer.from(plaintext, 'utf8');
        const encrypted = Buffer.concat([cipher.update(plainBytes), cipher.final()]);

        // Concatenate [salt || iv || ciphertext]
        const all = Buffer.concat([salt, iv, encrypted]);

        return Encrypter.base64UrlEncode(all);
    }

    /**
     * Decrypts a Base64-URL-encoded string using a password.
     * @param {string} password - The password to derive the decryption key.
     * @param {string} b64 - The Base64-URL-encoded string to decrypt.
     * @returns {string} The original decrypted plaintext.
     */
    static decrypt(password, b64) {
        const all = Encrypter.base64UrlDecode(b64);

        if (all.length < Encrypter.SALT_SIZE + Encrypter.IV_SIZE) {
            throw new Error("Ciphertext too short.");
        }

        // Extract components: [salt || iv || ciphertext]
        const salt = all.subarray(0, Encrypter.SALT_SIZE);
        const iv = all.subarray(Encrypter.SALT_SIZE, Encrypter.SALT_SIZE + Encrypter.IV_SIZE);
        const encrypted = all.subarray(Encrypter.SALT_SIZE + Encrypter.IV_SIZE);

        const key = Encrypter.deriveKey(password, salt);

        const decipher = crypto.createDecipheriv('aes-256-cbc', key, iv);

        const decrypted = Buffer.concat([decipher.update(encrypted), decipher.final()]);

        return decrypted.toString('utf8');
    }

    /**
     * Encodes a Buffer into a Base64 URL-safe string.
     * (Replaces +, / and removes = padding)
     * @param {Buffer} data - The buffer to encode.
     * @returns {string} The Base64 URL-safe string.
     */
    static base64UrlEncode(data) {
        return data.toString('base64')
            .replace(/\+/g, '-')  // Replace + with -
            .replace(/\//g, '_')  // Replace / with _
            .replace(/=/g, '');   // Remove padding
    }

    /**
     * Decodes a Base64 URL-safe string into a Buffer.
     * (Replaces -, _ and adds back padding)
     * @param {string} text - The Base64 URL-safe string.
     * @returns {Buffer} The decoded buffer.
     */
    static base64UrlDecode(text) {
        let padded = text.replace(/-/g, '+').replace(/_/g, '/');

        // Add padding back
        while (padded.length % 4) {
            padded += '=';
        }

        return Buffer.from(padded, 'base64');
    }

    /**
     * (Unused by Encrypt/Decrypt)
     * Derives a key using PBKDF2-HMAC-SHA1.
     * This matches the C# Rfc2898DeriveBytes(password, salt, iter) implementation.
     * @param {string} password - The password.
     * @param {Buffer} salt - The salt.
     * @returns {Buffer} The derived key.
     */
    static deriveKey_slow(password, salt) {
        return crypto.pbkdf2Sync(
            password,
            salt,
            Encrypter.ITER,
            Encrypter.KEY_SIZE,
            'sha1'
        );
    }

    /**
     * Derives a key using HKDF-SHA256 (Extract and Expand).
     * This matches the C# HMACSHA256-based DeriveKey implementation.
     * @param {string} password - The password (as input keying material).
     * @param {Buffer} salt - The salt.
     * @returns {Buffer} The derived key.
     */
    static deriveKey(password, salt) {
        // crypto.hkdfSync implements HKDF (Extract-and-Expand)
        // 'sha256': The hash function
        // password: The input keying material (IKM)
        // salt: The salt
        // '': The 'info' or context (empty in the C# version)
        // KEY_SIZE: The length of the output keying material (OKM)
        return crypto.hkdfSync(
            'sha256',
            password,
            salt,
            '',
            Encrypter.KEY_SIZE
        );
    }

    /**
     * Generates a buffer of cryptographically secure random bytes.
     * @param {number} n - The number of bytes to generate.
     * @returns {Buffer} The random bytes.
     */
    static randomBytes(n) {
        return crypto.randomBytes(n);
    }
}

/**
 * Formats a Date object to an ISO string with 7 decimal places for milliseconds,
 * matching the C# 'o' format specifier (e.g., 2023-10-27T10:00:00.1234567Z).
 * @param {Date} dt - The Date object.
 * @returns {string} The formatted date string.
 */
function toCSharpISOString(dt) {
    // getISOString() returns 3 decimal places (e.g., .123Z)
    const iso = dt.toISOString();
    // We slice off the 'Z' and add the remaining '0000Z' to get 7 decimal places
    return iso.slice(0, -1) + '0000Z';
}

/**
 * Creates a self-generated temporary token.
 * @param {string} parent_token - The parent token.
 * @param {Date} expire - The expiration date object.
 * @param {string | null} [permissions=null] - Optional permissions string.
 * @param {string | null} [rid=null] - Optional rid.
 * @param {string | null} [fid=null] - Optional fid.
 * @param {string | null} [sourceipv4=null] - Optional source IP.
 * @param {string | null} [host=null] - Optional host.
 * @returns {string} The generated temporary token.
 */
function createSelfGeneratedTempTokenV3getTempAPIKeyV2(
    parent_token,
    expire,
    permissions = null,
    rid = null,
    fid = null,
    sourceipv4 = null,
    host = null
) {
    if (!parent_token) {
        throw new Error("empty parent_token not allowed");
    }

    const keyfreg = parent_token.split('i', 2);
    const accid = keyfreg[0];
    // Use slice to get last 4 chars, handling strings shorter than 4
    const last4_parent_token = parent_token.slice(Math.max(0, parent_token.length - 4));

    const sbPayload = [];

    // Use a custom function to match C#'s "o" format (7 decimal places)
    sbPayload.push(toCSharpISOString(expire));

    if (permissions != null) {
        sbPayload.push("!p");
        sbPayload.push(permissions);
    }

    if (rid != null) {
        sbPayload.push("!r");
        sbPayload.push(rid);
    }

    if (fid != null) {
        sbPayload.push("!f");
        sbPayload.push(fid);
    }

    if (sourceipv4 != null) {
        sbPayload.push("!i");
        sbPayload.push(sourceipv4);
    }

    if (host != null) {
        sbPayload.push("!h");
        sbPayload.push(host);
    }

    const payloadString = sbPayload.join('');
    const emsg = Encrypter.encrypt(parent_token, payloadString);

    return `${accid}i3${last4_parent_token}${emsg}`;
}

// Export the class and the function
module.exports = {
    Encrypter,
    createSelfGeneratedTempTokenV3getTempAPIKeyV2,
    toCSharpISOString // Exporting this helper in case it's needed externally
};
Create a Unit Test
This file is used to call the function and generate the temporary token, keeping the code organised and easy.
Step 1: create another file:
test.js
Step 2: Open test.js and paste the following code:
const { createSelfGeneratedTempTokenV3getTempAPIKeyV2 } = require('./encrypter');

// TODO: Replace with your real parent token from Cincopa
const parentToken = "PASTE_YOUR_PARENT_TOKEN_HERE";

// Set the expiration time (example: 10 minutes from now)
const expireDate = new Date(Date.now() + 10 * 60 * 1000);

// Optional parameters:
const permissions = "asset.read";        // e.g., "read", "upload", "write"
const rid = null;                  // e.g., "A0HD1kfyuwH1" or null
const fid = null;                  // e.g., "G123456" or null
const sourceipv4 = null;           // e.g., "192.168.0.10" or null
const host = null;                 // e.g., "mydomain.com" or null

const tempToken = createSelfGeneratedTempTokenV3getTempAPIKeyV2(
    parentToken,
    expireDate,
    permissions,
    rid,
    fid,
    sourceipv4,
    host
);

console.log("Generated Temporary Token:");
console.log(tempToken);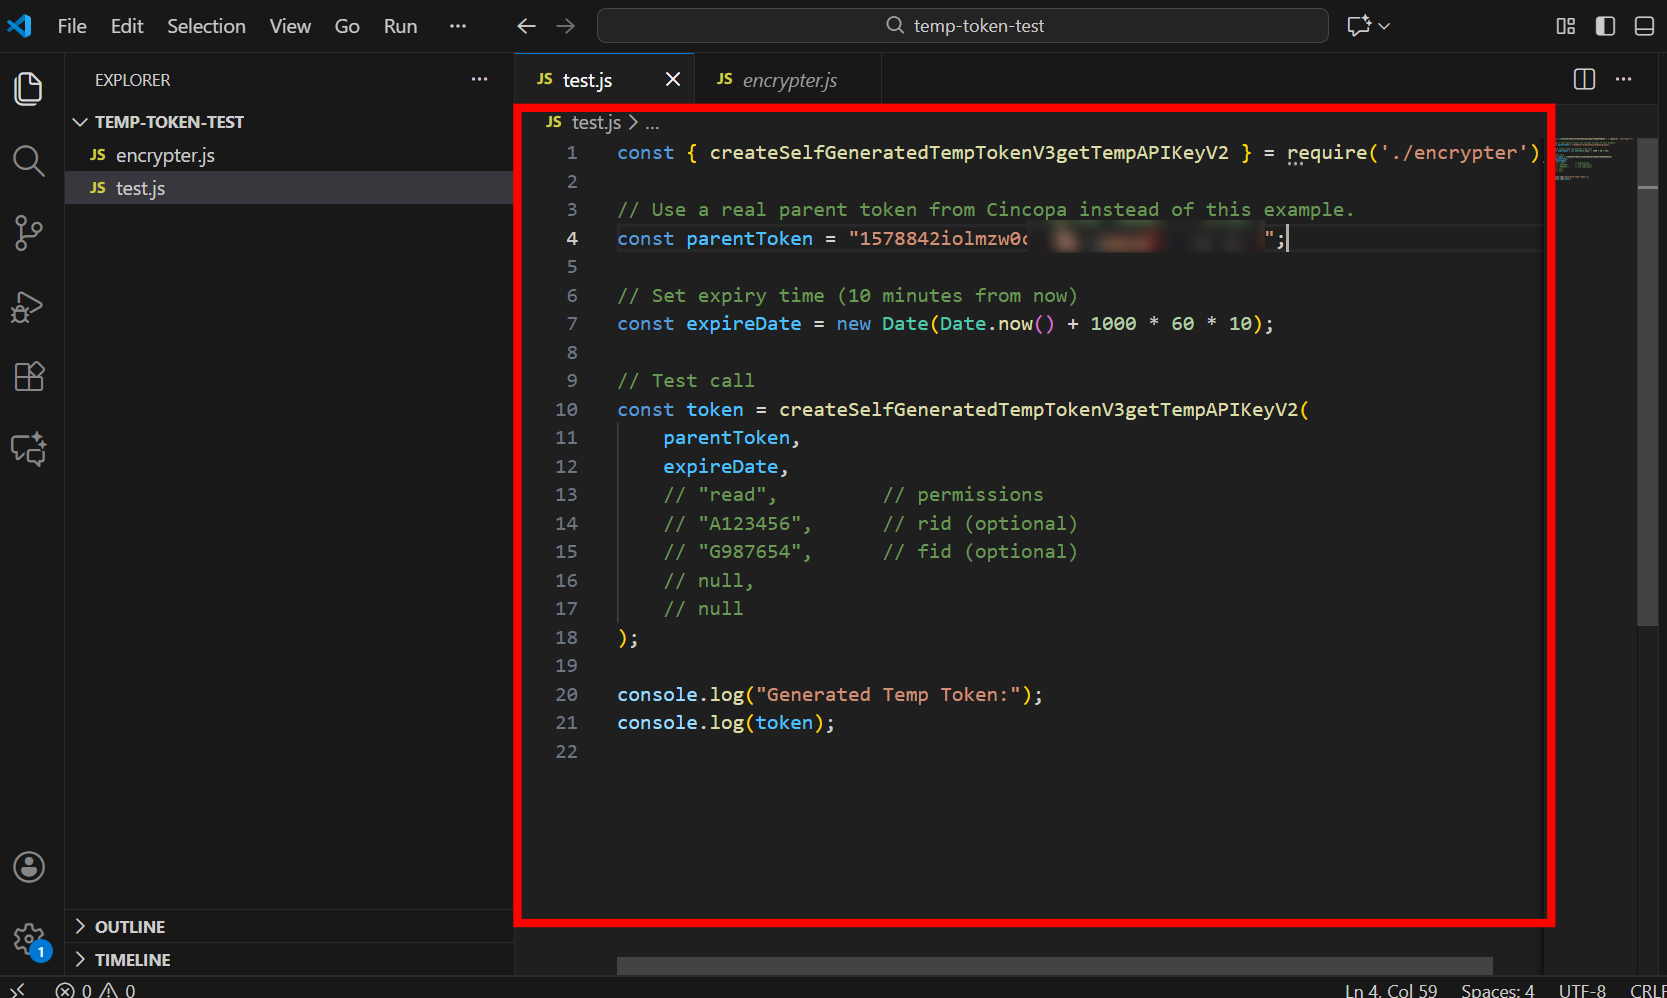
Step 3: Save the file.
Run the Script and Generate the Token
Step 1: Open VS Code
Step 2: Navigate to the folder where you created the files. For example
cd C:\Users\<YOUR_USERNAME>\Desktop\temp-token-test
Step 3: Run the script
node test.js
Output
If everything is set up correctly, you will see output similar to this:
Test Temporary Token Functionality
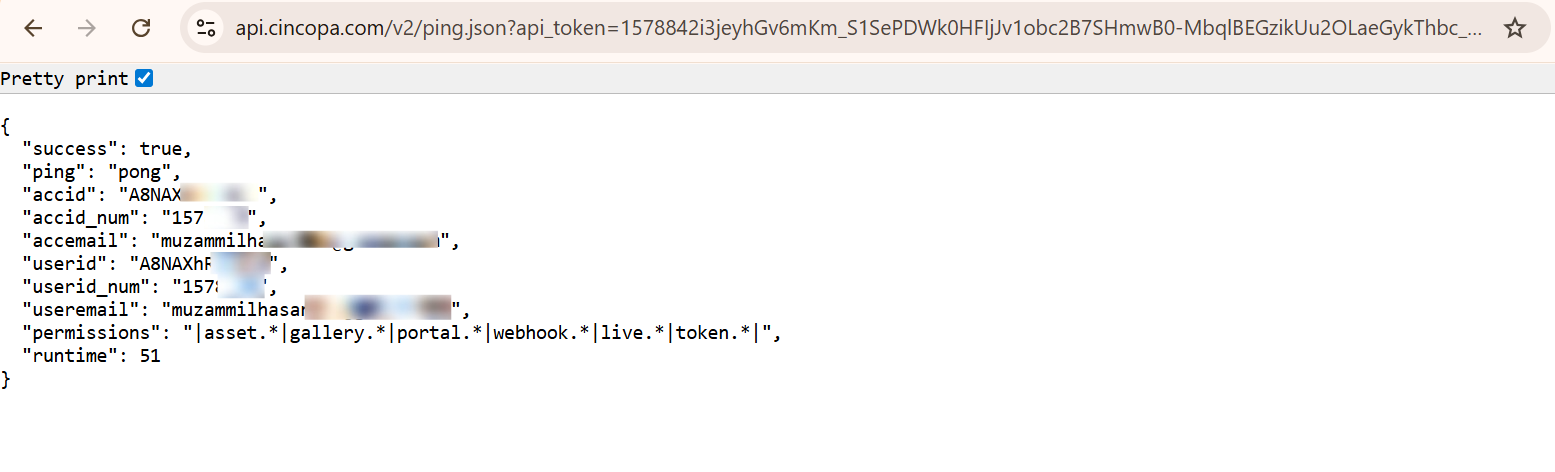
After generating the temporary token, you can verify whether it is valid by calling the Cincopa ping API endpoint.
Replace GENERATED_TOKEN with the token created by your script and open the following URL in your browser:
https://api.cincopa.com/v2/ping.json?api_token=GENERATED_TOKEN
Response Body
If the temporary token is valid, you will receive a successful JSON response.
 If the token is expired, invalid, or incorrectly generated, the API will return an error response.
The Bottom Line
Temporary tokens are encrypted and expire automatically, so the parent token is never exposed. They can be generated locally without a backend API call, eliminating HTTP requests and making generation instantaneous. Because tokens are short-lived and limited by the risk of misuse is reduced. The system also supports flexible controls such as custom permissions, resource-level restrictions, IP whitelists, and host binding.